


How to Tape Your Knee with Kinesiology Tape: Runner's Knee, PFPS & IT Band

Written by: Professor Geek (The Geek Educator)
Edited by: Greg Kowalczyk, CEO & Co-Founder, TapeGeeks Inc.
Knee pain stops more runners mid-season than almost any other injury. Whether it is the dull ache of patellofemoral pain syndrome grinding in on long runs, the sharp outer-knee bite of IT band syndrome, or the nagging below-the-kneecap throb of patellar tendonitis, the pattern is the same — pain that builds over miles and takes days to settle. Kinesiology tape is not a cure for any of these conditions, but applied correctly it can reduce pain signals, improve joint position awareness, and let you keep moving while your rehab addresses the root cause.
This guide gives you two complete, step-by-step taping protocols — one for runner's knee and PFPS, one for IT band syndrome — based on the same application principles used by physios and sports medicine clinicians. You will also find the clinical evidence for why it works, the exact tension levels to use, how long to leave tape on, and when taping is no longer enough.
Quick Answer: For runner's knee and PFPS, use two 14-inch strips curving around each side of the kneecap at 25% stretch, plus a 4-inch decompression strip across the patellar tendon at 50% stretch. Bend the knee to 90 degrees before applying. Tape lasts 2–4 days, can get wet, and should be removed if skin becomes irritated.
What Causes Knee Pain in Runners?
Before picking up the tape, it helps to know which structure is actually causing your pain. The knee itself is a hinge joint under enormous load — at easy running pace, forces through the patellofemoral joint can reach 4–5 times bodyweight. The three most common running-related knee conditions each have a distinct pain pattern and respond to slightly different taping approaches.
Runner's Knee (Patellofemoral Pain Syndrome — PFPS)
PFPS is the umbrella diagnosis for pain arising around or behind the kneecap. It accounts for roughly 16–25% of all running injuries and is more common in women than men. The pain typically builds during runs, worsens going downstairs or sitting for long periods (the "theatre sign"), and eases with rest. The underlying cause is usually a combination of patellar maltracking, hip weakness, and training load errors — not cartilage damage in most cases.
IT Band Syndrome
Iliotibial band syndrome is the leading cause of lateral (outer) knee pain in runners, responsible for up to 12% of running injuries. Pain sits right at the lateral femoral condyle — that bony prominence on the outside of the knee where the IT band passes over at around 30 degrees of knee flexion (the same angle that occurs hundreds of times per mile when running). It often has a sudden onset mid-run and a characteristic burning quality that forces runners to stop completely.
Patellar Tendonitis (Jumper's Knee)
Patellar tendonitis — often called jumper's knee — involves degeneration of the patellar tendon at its attachment to the bottom of the kneecap. Pain sits directly below the kneecap and is most pronounced at the start of exercise, sometimes easing during a run before returning afterwards. Unlike PFPS, patellar tendonitis is a tendinopathy — the tissue structure is compromised — which means load management matters more than any taping approach. That said, a decompression strip across the tendon can reduce pain enough to train through mild cases.
Does Kinesiology Tape Actually Work for Knee Pain?
The honest answer: yes, with caveats worth understanding before you spend money on tape.
A 2016 study published in the Journal of Physical Therapy Science (Kurt et al., 2016) found that kinesiology tape applied around the knee significantly reduced pain scores and improved joint position sense in PFPS patients compared to controls. Improved proprioception matters because poor position sense is one reason the patella tracks incorrectly in the first place.
The 2018 International Patellofemoral Pain Research Retreat consensus statement (Collins et al., 2018, Br J Sports Med) concluded that taping — both kinesiology and McConnell — is a valid adjunct treatment for PFPS, particularly when combined with exercise therapy.
For IT band syndrome, a 2022 study in Gait & Posture (Watcharakhueankhan et al., 2022) found that kinesiology taping produced immediate changes in running biomechanics, muscle activation patterns, and perceived comfort — findings that support its use for symptom management during training.
How it works mechanically: the elastic tape lifts and wrinkles the skin as the joint moves, creating significant sensory input to the brain. This input competes with and partially blocks pain signals — the gate control theory of pain in action. The tape also increases skin mechanoreceptor activity, which improves proprioceptive feedback and can influence how the muscles around the knee fire.
Important: Kinesiology tape manages symptoms — it does not fix the underlying problem. Using tape to push through pain without addressing training load, biomechanics, or muscle weakness can turn a manageable injury into a chronic one. Tape buys you time to do the work; it is not a substitute for it.
What You Will Need
- A roll of quality kinesiology tape (5cm wide is standard for knee applications)
- Scissors with rounded tips
- Clean, dry skin — free of lotion, sunscreen, or sweat
- A mirror or phone camera if applying to yourself
- 10 minutes and a comfortable place to sit
Round the corners of every strip before applying — square corners peel up within hours, rounded corners last the full 2–4 days. If you have dense leg hair, trim (not shave) it down to about 1/8 inch first. Some short hair actually helps adhesion; bare skin can be too smooth for the glue to grip on sweaty runs.
Shop TapeGeeks Kinesiology Tape →
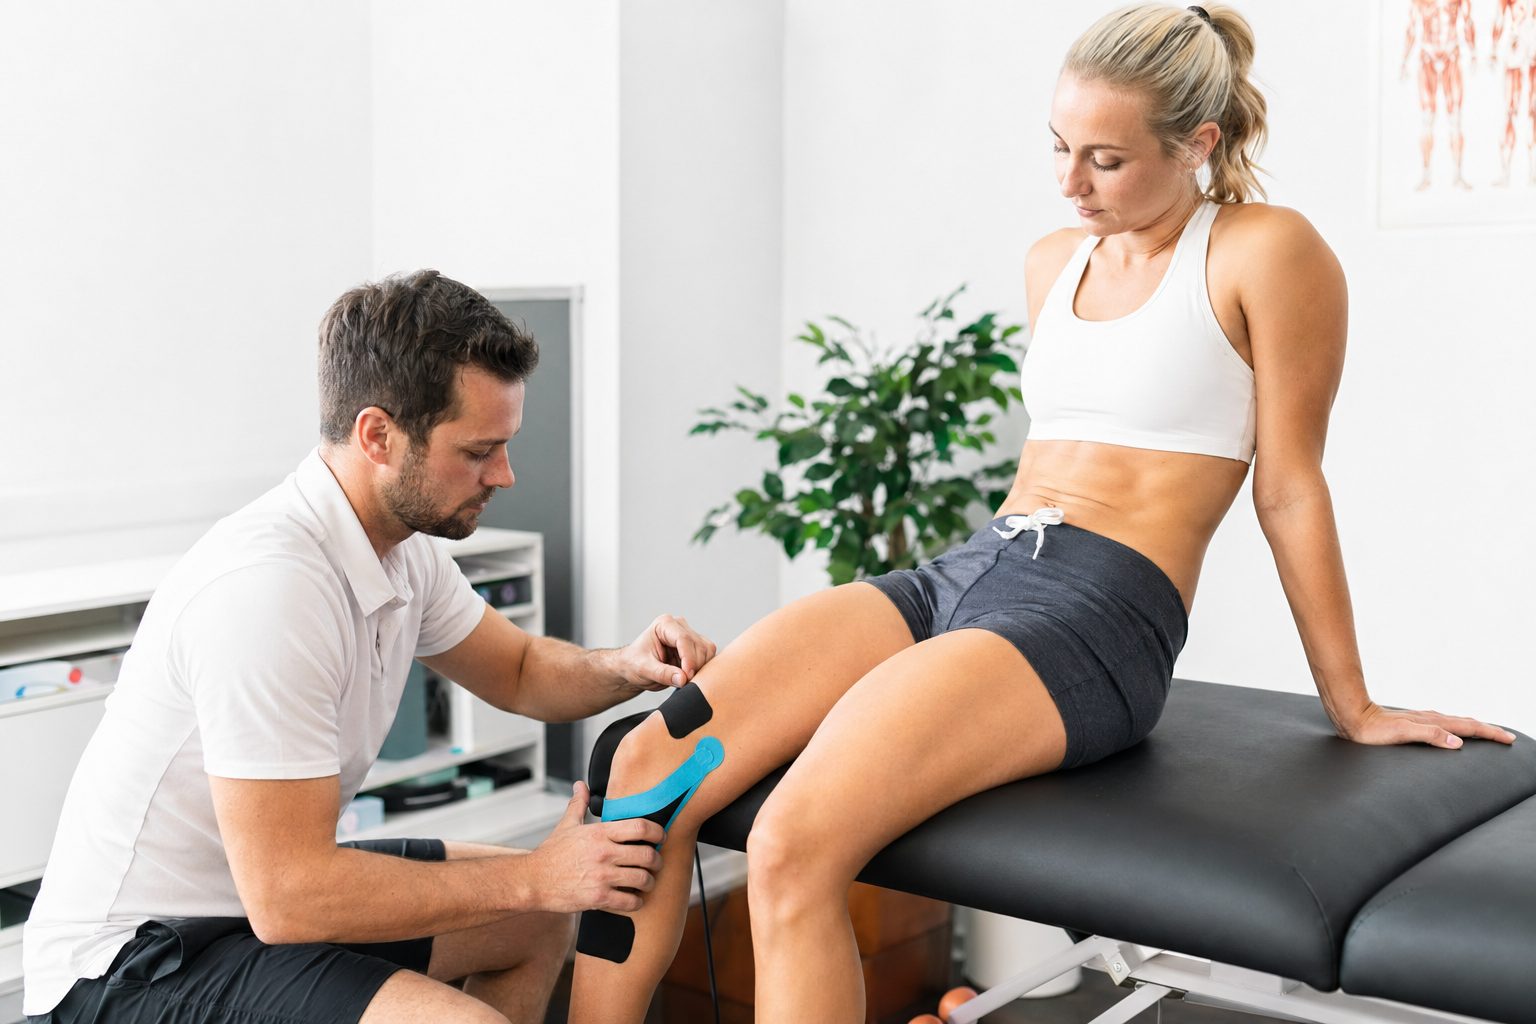
How to Tape for Runner's Knee and PFPS
This technique uses three strips total: two longer strips that curve around the kneecap like brackets, and one short decompression strip across the patellar tendon. It works for front-of-knee pain, patellar tendonitis, and general PFPS symptoms. The goal is to improve proprioceptive feedback, reduce nociception around the joint, and create skin lift that assists fluid dynamics beneath the patella.
Cut Your Strips
- Two strips approximately 14 inches (35cm) long — round all four corners
- One strip approximately 4 inches (10cm) long — round all four corners
Starting Position
Sit on a chair or bed with your knee bent to 90 degrees. If 90 degrees is painful, use whatever angle is comfortable. Bending the knee stretches the skin over the joint, which means the tape will create more lift and wrinkling when you straighten the leg — and that movement is where the therapeutic effect comes from.
Step-by-Step Application
- Anchor the first strip: Peel about 1–2 inches of backing from one end of the first long strip. Place this anchor below and to the inside of the kneecap, a couple of inches beneath it. Press firmly — no stretch on the anchor.
- Curve around the inside of the kneecap: Unroll the tape upward and around the inner (medial) side of the kneecap, applying approximately 25% stretch as you go. Picture the tape following the curve of a banana around the inside edge of the patella. Continue up onto the inner thigh.
- Finish with no tension: For the final 1–2 inches as you reach the thigh, release all stretch and lay the tape flat. Press firmly and rub vigorously along the full strip to activate the heat-sensitive adhesive.
- Apply the second strip as a mirror image: Take your second long strip and repeat the process on the opposite (outer/lateral) side of the kneecap. Anchor below and to the outside, curve around the lateral edge of the patella with 25% stretch, finish up the outer thigh with no tension. The two strips should now form a bracket shape around the kneecap — they will cross below it.
- Apply the decompression strip: Take the short 4-inch strip and tear the backing paper from the centre (not from one end). Peel the backing away from the middle out. Place this strip horizontally directly over the patellar tendon — the cord-like structure just below the kneecap. Apply 50% stretch to the middle portion. Lay the ends down with zero tension on each side.
- Rub the entire application: Use your palm to rub firmly over all strips for 30 seconds. The friction generates heat that activates the glue. This step makes a significant difference to how long the tape stays on.
- Check the result: Straighten your leg. The skin under the tape should wrinkle and bunch noticeably. If it does not, the tension was too low or the skin was not stretched enough during application. Good skin lift = the tape is working.
Pro tip: If you get pain right at the bottom of the kneecap or over the quadriceps tendon above it, add a second short decompression strip above the patella using the same centre-peel, 50% stretch technique. This optional fourth strip is worth adding if your pain covers both ends of the kneecap.
For more on managing the full spectrum of runner's knee treatment options, see our guide: Runner's Knee Treatments — What Actually Works.
How to Tape for IT Band Syndrome
IT band taping uses a different approach because the pain sits on the outer knee, not the front. The goal is to reduce friction at the lateral femoral condyle, alter tension through the IT band, and target the specific painful point with a cross-strip. You need two strips for this technique.
Cut Your Strips
- One long strip: enough to run from the front of the shin bone to about halfway up the outer thigh — typically 20–24 inches depending on leg length
- One shorter strip: 4–6 inches, to be placed directly over the most painful point
Starting Position
Sit with your knee bent to approximately 90 degrees. If this position is painful, adjust to what is comfortable. You can also apply this tape with help from someone else, which makes it easier to maintain consistent tension along the full strip.
Step-by-Step Application
- Anchor on the shin: Peel 1–2 inches of backing from one end of the long strip. Apply the anchor to the front of the shin bone (tibia), just below and in front of the outer knee. No stretch on this anchor.
- Wrap around the outer knee joint: As you bring the tape upward and around the outside of the knee, apply a moderate stretch — approximately 25–50%. This portion of the tape is crossing directly over the lateral femoral condyle, which is the pain epicentre for most IT band presentations.
- Run up the outer thigh with light stretch: Continue the strip up the outside of the thigh with gentle stretch — about 10–15%. The tape should follow the line of the IT band.
- Finish with no tension: Lay the final 1–2 inches onto the thigh with zero stretch. Press firmly and rub to activate the adhesive.
- Apply the cross-strip over the pain point: Take the shorter strip and tear the backing from the centre. With the backing peeled away from the middle, apply the tape at an oblique angle directly over your most painful point, crossing the first strip. Use firm stretch — 50–75% — in the centre of this strip. Place both ends with zero tension. This localised pressure strip is often where people notice the most immediate relief.
- Rub to activate: Press and rub firmly over both strips for 30 seconds. Check that the skin over the outer knee shows visible lift when you straighten the leg.
Pro tip: IT band taping works best for symptom management during runs — it will not change the underlying hip weakness or stride mechanics driving the problem. Use it as a training aid while you work through hip strengthening exercises. On its own, tape will not get you to the other side of an IT band flare.
How Long to Leave Tape On and When to Remove It
Kinesiology tape is designed to stay on for 2–4 days. Most people find it starts to peel or lose adhesion around the 3-day mark, which is a natural signal to replace it. You can shower and swim with the tape on — the acrylic adhesive is water-resistant. When towelling off, pat dry rather than rubbing, since the friction from a towel will lift the edges.
Remove the tape immediately if you notice any of the following:
- Persistent redness, itching, or burning under the tape (contact dermatitis)
- Blisters or skin peeling
- Pain on the skin surface (distinct from joint pain)
- Any open wound or broken skin under the tape
To remove kinesiology tape without skin trauma, peel slowly in the direction of hair growth — never pull the tape back on itself at 90 degrees. Wetting the tape with warm water in the shower before removal makes it come off much more cleanly on sensitive skin.
On the question of how often to re-tape: there is no firm rule. Some runners tape before every hard session during a flare-up; others use it continuously for 2–3 weeks while building up rehab strength. I would not rely on it indefinitely — if you need tape every session for months on end, the underlying issue has not been properly addressed.
For heel and foot taping that pairs well with knee work, see our guide: Kinesiology Taping for Heel Pain.
When to See a Physio Instead of Taping
Taping is a tool for managing symptoms while you do the actual rehab work. It is not a substitute for clinical assessment, and there are situations where taping it and training through is the wrong call entirely. See a physio or sports medicine physician if:
- Your knee pain has not improved after 2–3 weeks of reduced training load and consistent taping
- Pain woke you from sleep
- Your knee locks, catches, or gives way unexpectedly
- There is significant swelling that persists more than 24 hours after activity
- You have numbness or tingling below the knee
- The pain came on suddenly after a specific incident (fall, collision, twist)
- You are altering your gait to compensate — this pattern tends to create secondary injuries upstream
Frequently Asked Questions
Research shows kinesiology tape can reduce pain and improve proprioception around the knee, particularly for patellofemoral pain syndrome. A 2016 study in the Journal of Physical Therapy Science found significant short-term improvements in joint position sense and clinical pain scores. The effect is real but modest — tape works best as a complement to rehab, not a replacement for it.
Most people wear kinesiology tape for 2–4 days before replacing or removing it. You can shower and swim with it on — just pat dry rather than rubbing. Remove it immediately if you notice redness, itching, blistering, or skin irritation under the tape.
For runner's knee and PFPS, use 25% stretch on the long anchor strips curving around the kneecap, and 50% stretch on the horizontal decompression strip across the patellar tendon. Always apply the first and last inch of each strip with zero tension. For IT band, use 25–50% on the main strip and firm stretch (50–75%) on the cross-strip over the pain point.
Yes — the techniques in this guide are designed for self-application. Sit on a chair or bed with your knee bent to 90 degrees. A mirror or phone camera nearby helps you check placement. The patellofemoral technique is slightly easier to self-apply than the IT band method. Having a partner apply the long IT band strip helps maintain consistent tension.
No. McConnell taping uses rigid, non-stretch sports tape to physically reposition the patella — it creates structural correction of patellar tracking. Kinesiology tape is elastic and works by improving proprioception and modulating pain signals. Both have evidence for PFPS, but they work differently. If patellar tracking is the primary problem, a physio can assess which approach suits your presentation.
If you have dense leg hair, trim it to about 1/8 inch — don't shave fully, as some short hair actually helps adhesion. Clean, dry skin is non-negotiable. Avoid applying tape over lotion, sunscreen, or any skin oil. If adhesion is a persistent problem, a light spray of adhesive enhancer (or even aerosol hair spray) on the skin before applying tape makes a significant difference.
See a physio if your knee pain has not improved within 2–3 weeks of modified activity and taping, if pain is severe or woke you from sleep, if your knee locks or gives way, if there is significant persistent swelling, or if you have numbness or tingling in the lower leg. Taping manages symptoms — it does not diagnose or fix the underlying cause of the problem.
Yes, and that is usually the point. Kinesiology tape is designed for use during activity. Many runners find it reduces discomfort enough to train through mild to moderate knee pain. That said, pain is still feedback — if the tape reduces pain but you are compensating with your gait, back off the intensity and address the underlying cause before adding more volume.
Bottom Line
Kinesiology taping for the knee is one of the more evidence-supported taping techniques in sports medicine, particularly for patellofemoral pain syndrome. It works by improving proprioception and reducing pain signal intensity — not by structurally supporting or repositioning the joint. Applied correctly, with the right tension levels and strip placement, it gives you a genuine tool for getting through training sessions while rehab exercises address the root cause.
The technique takes practice. Your first application will not be as clean or as effective as your fifth. Expect some trial and error with tension levels and strip positioning — small adjustments often make a meaningful difference to how much relief you get.
If you are ready to start, TapeGeeks kinesiology tape is designed for exactly this kind of use — strong enough to last through 3+ days of training, flexible enough to move with the knee through full range of motion, and available in precut or roll format.
Shop TapeGeeks Kinesiology Tape →
This guide is part of TapeGeeks' commitment to providing athletes with practical, evidence-based tools for recovery and performance.