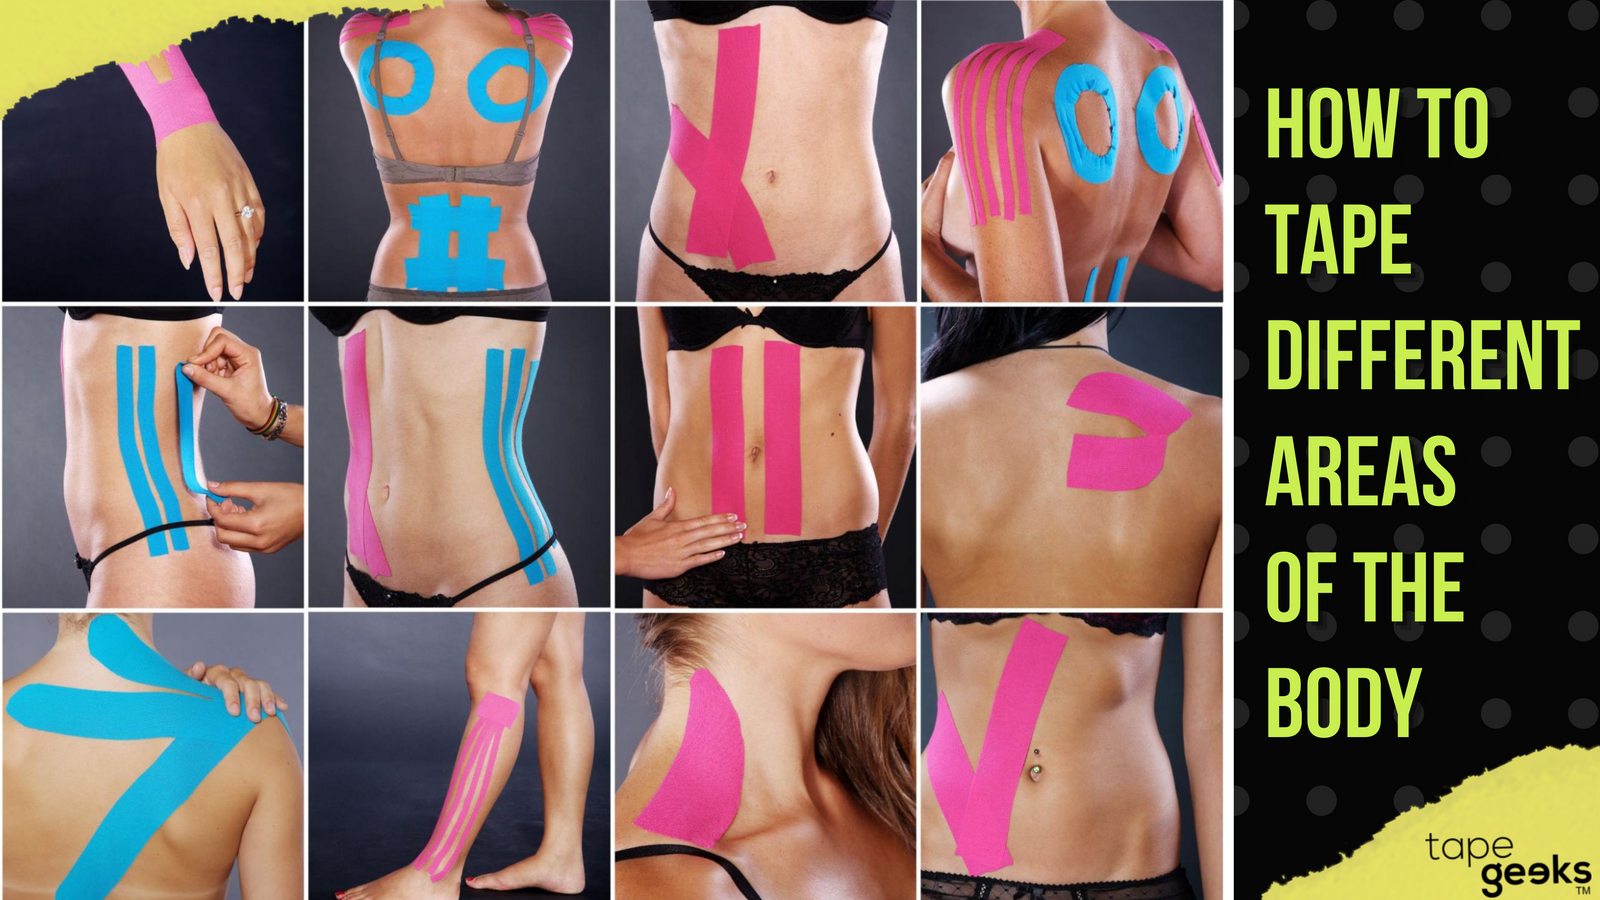
How to apply kinesiology tape on different areas of the body
20 min read
Kinesiology tape is one of the most versatile tools in sports medicine — and knowing how to apply it correctly to different areas of the body can mean the difference between pain relief that actually works and tape that peels off after 20 minutes. Whether you're dealing with a groin strain, wrist pain, shoulder impingement, neck tension, or even edema, this guide covers kinesiology taping techniques for over 25 specific body parts and conditions.
Each section includes the correct body position, tape tension (0%, 25%, or 50%), strip direction, and activation tips. If you're new to kinesiology taping, read our 8 application tips guide first.
[cta-kin-tape]
In more recent years, however, kinesiology taping has gained popularity among professional athletes to help with pain alleviation as well as getting support for certain areas of the body. Here is a step-by-step taping guide for different areas of the body.
KT Tape Application Chart — All Body Parts at a Glance
Use this quick-reference chart to look up the correct body position, number of strips, tension level, and expected wear time for any area. For the full step-by-step instructions, jump to the relevant section using the table of contents above.
1.1. In a standing position with your heel pushed firmly into the ground, measure the first security strip running from the groin towards the knee. Measure the second security strip running from the inside of the groin towards the knee.
1.2.Round the tape ends.
1.3. Apply the first security strip with 0% tension.
1.4. Apply the second security strip forming an X pattern on the inside of the leg with 0% tension.
1.5. Rub in the tape to activate the adhesive.
2. Quadricep
2.1. Start in a standing position with the heel placed firmly into the ground with weight shifted forward.
2.2. Measure the first security strip from the outside of the quadricep towards the inside of the knees and the second security strip from the inside of the quadricep towards the outside of the knee.
2.3.Round the tape ends.
2.4.Place the first security strip with 0% tension to finish along the inside of the knee.
2.5.Place the second security strip along the inside of the groin forming an X-pattern to finish along the outside of the knee.
3.1. Start by being in a standing position with the heel pushed firmly into the ground.
3.2. With the weight shifted backward, measure the first security strip from the inside of the hamstring towards the outside of the knee.
3.3. Measure the second security strip on the outside of the hamstring towards the inside of the knee.
3.4.Round the tape ends.
3.5. Place the first security strip running from the inside of the hamstring towards the outside of the knee with 0% tension.
3.6. Place the second security strip starting at the outside of the hamstring running towards the inside of the knee. Do this with 0% tension. This will form an X pattern on the back of the leg.
4.1. Start by being in a lying position with a knee flexed and with the foot pushed firmly into the table or floor.
4.2. Measure one compression strip of the knee joint below the knee cap.
4.3. Measure the first security strip on the inside edge of the knee.
4.4. Measure the second security strip to run along the outside edge of the knee.
4.5. Round the tape ends.
4.6. With 50% tension on the tape, apply the compression strip to span the knee joint just below the kneecap.
4.7. Apply the first security strip running from the inside of the lower leg along the outside edge of the kneecap to frame in the kneecap. This tape should have 0% tension on it.
4.8. Apply the second security strip running from the outside of the lower leg along the inside edge of the knee, again, framing in a kneecap. This should also have 0% tension.
4.9. Rub in the tape to activate the adhesive.
5. Calf
*For this taping protocol, you would need another person’s help since it is a hard-to-reach area.
5.1. Lie on the table with the foot and the ankle pulled toward the head.
5.2.Start by having the assisting partner measure the compression strip spanning the area of complaint.
5.3. Measure a security strip on the underside of the heel to finish on the outside of the calf.
5.4. Measure a second security strip in the underside of the heel to finish along the inside of the calf.
5.5.Round the tape ends.
5.6. With 50% tension on the tape, have the assisting partner apply the compression strip to the area of complaint.
5.7. Apply the first security strip with 0% tension. Have it run from the underside of the heel to cross over to the Achilles tendon and finish along the outside of the calf.
5.8. Apply the second security strip with 0% tension. Start it along the underside of the heel, across the Achilles tendon to finish along the inside of the calf. The tape should form an X pattern over the Achilles tendon.
5.9. Rub in the tape to activate the adhesive.
6. Foot
*For this taping protocol, you would need another person’s help since it is a hard-to-reach area.
6.1. Start by lying on your back with the head and toe pulled towards the head and the toes splayed.
6.2. Have the assisting partner measure the security strip running from the bottom of the big toe towards the heel.
6.3. Measure a second security strip running from the top of the outside of the foot to finish along the inside of the big toe.
6.4. Round the tape ends.
6.5. Apply the first security strip with little to no tension, running from the bottom side of the big toe, to finish along the bottom of the heel.
6.6. Apply the second security strip, running from the outside top of the foot, to loop around the foot with 0% tension. Have it finished along the inside of the big toe.
7.1. Place the ankle in a neutral position especially if it’s painful.
7.2. Measure a compression strip from the arch to loop around the Achilles tendon and finish along the top of the foot.
7.3. Measure a security strip spanning from the top of the foot, to loop around the arch and finish along the outside of the lower leg.
7.4. Round the tape ends.
7.5. Apply the compression strip with 50% tension, starting along the inside portion of the arch to loop around the Achilles tendon. Finish along the outside top portion of the foot.
7.6. Apply the security strip with 0% tension. Start it along the top outside portion of the foot and have it looped underneath the arch. Make sure the tape finishes along the outside portion of the lower leg.
*For this taping protocol, you would need another person’s help since it is a hard-to-reach area.
1.1. Start by being in a comfortable position with a slight forward lean.
1.2. Have the assisting partner measure a compression strip to span the area of complaint.
1.3. Next, have him/her measure a security strip starting from the top of the hip to span the area of complaint.
1.4. Then, measure a second security strip to match the first.
1.5. With 50% tension, have the assisting partner apply the compression strip to span the area of complaint.
1.6. Next, apply the first security strip with 0% tension running from the top of the hip to span the area of complaint.
1.7. Apply the second security strip with 0% tension to match the first.
1.8. Rub in the tape to activate the adhesive.
2. Full back
*For this taping protocol, you would need another person’s help since it is a hard-to-reach area.
2.1. Start by being in a comfortable position with a slight forward lean.
2.2. Have the assisting partner measure the first compression strip in the primary area of complaint and a second compression strip in the secondary area of complaint.
2.3. Next, have him/her measure the first security strip starting at the top of the hip to span the entire back and a second security strip to match the first.
2.4. Round the tape ends.
2.5. Have the assisting partner apply the first compression strip with 50% tension along the primary area of complaint.
2.6. Apply the second compression strip in the second area of complaint with 50% tension.
2.7. Apply the first security strip with 0% tension, start at the top of the hip and have the tape span the entire back.
2.8. Apply the second security strip with 0% tension spanning from the top of the hip to run the entire length of the back.
*For this taping protocol, you would need another person’s help since it is a hard-to-reach area.
3.1. Stay in a standing position with the arms raised.
3.2. Have an assisting partner measure a security strip from the midline, wrapping around the ribs towards the opposite hip.
3.3. Double the length of the tape and round the tape ends.
3.4. Rip the tape in half and anchor it at the midline. Take one edge of the security strip and wrap it around the ribs to finish the opposite side of the hip. This should be done with 0% tension.
3.5. Take the other edge of the security strip and wrap it around the ribs to finish at the opposite hip, again, with 0% tension.
3.6. Rub in the tape to activate the adhesive.
4. Unilateral neck
*For this taping protocol, you would need another person’s help since it is a hard-to-reach area.
4.1. Start by being in a seated position with the head and neck turned towards the opposite shoulder.
4.2. Have an assisting partner measure a compression strip spanning the area of complaint.
4.3. Next, have him/her measure the security strip starting at the base of the skull to finish in the mid-back.
4.4. Round the tape ends.
4.5. Have the assisting partner apply the compression strip ideally with 50% tension spanning the area of complaint.
4.6. Next, apply the security strip starting at the base of the skull to finish in the mid-back. It should be applied with 0% tension.
4.7. Rub in the tape to activate the adhesive.
5. Bilateral neck
*For this taping protocol, you would need another person’s help since it is a hard-to-reach area.
5.1. Start by being in a comfortable seated position.
5.2. Have the assisting partner measure a compression strip to span the area of complaint.
5.3. Next, measure the first security strip from the base of the skull towards the mid-back and a second security strip to match the first.
5.4. Then, bring the chin towards the chest.
5.5. Have the assisting partner apply the first compression strip expanding the area of complaint with 50% tension.
5.6. Then, have him/ her apply the first security strip starting at the base of the skull to finish in the mid-back. This should be applied with 0% tension.
5.7. Apply the first security strip to match the first starting at the base of the skull to finish in the mid-back with 0% tension.
5.8. Rub in the tape to activate the adhesive.
Upper Limb Pain
1. Bicep
1.1. Place the shoulder and the elbow in an extended position while the patient makes a fist.
1.2. Measure the first security strip from the outside of the shoulder to the inside of the elbow and the second security strip on the inside of the shoulder to the outside of the elbow.
1.3. Round the tape ends.
1.4. With 0% tension on the tape, place the first security strip from the inside of the shoulder towards the outside of the elbow.
1.5. Take the second security strip, and again with 0% tension, run it from the outside of the shoulder towards the inside of the elbow.
1.6. Rub in the tape to activate the adhesive.
2. Tricep
* For this protocol, it is ideal to have another person assist to make the application easier.
2.1. Have the patient flex the elbow and make a fist. Draw the elbow away from the side.
2.2. Measure the first security strip running from the outside of the shoulder towards the inside of the elbow and the second security strip running from the inside of the shoulder towards the outside of the elbow.
2.3. Round the tape ends.
2.4. With 0% tension, take the first security strip from the inside of the shoulder towards the outside of the elbow. With the second security strip, take it from the outside of the shoulder towards the inside of the elbow. Again, with 0% tension.
2.5. Rub in the tape to activate the adhesive.
3. Lateral elbow
3.1. Measure a compression strip in the area of discomfort. Measure a security strip running from the inside of the wrist, wrapping outward along the arm to finish the elbow.
3.2. Round the tape ends.
3.3. Have the elbow extended and the wrist flexed while making a strong fist.
3.4. Apply the compression strip with 50% tension on the tape in the area of concern.
3.5. Apply the security strip at the inside of the wrist wrapping outward around the forearm to finish at the level of the elbow.
3.6. Rub in the tape to activate the adhesive.
4. Medial elbow
4.1. Measure a compression strip to span the area of discomfort. Measure a security strip running from the inside of the wrist, spanning the forearm to finish at the elbow.
4.2. Round the tape ends.
4.3. Have the elbow and wrist extended while you squeeze the fingers tightly.
4.4. With 50% tension on the tape, place the compression strip to span the area of discomfort.
4.5. Place the security strip starting at the inside of the wrist, wrapping around the forearm to finish at the level of the elbow. Apply the security strip with 0% tension.
4.6.Rub in the tape to activate the adhesive.
5. Wrist
5.1. Measure the first security strip from the outside of the thumb wrapping around the wrist to finish on the front of the forearm.
5.2. Measure the second security strip, running from the inside of the baby finger. Again, wrapping around the wrist to finish on the front of before.
5.3. Round the tape ends.
5.4. Place the wrist in a neutral position while making a fist.
5.5. Apply the first security strip with 0% tension starting at the thumb and wrapping around the wrist to finish on the front of the forearm.
5.6. Apply the second security strip starting at the inside of the baby finger, wrapping around the wrist to finish on the front of the forearm. Again, with 0% tension.
5.7. Rub in the tape to activate the adhesive.
6. Shoulder
6.1. Place the shoulder in a neutral position. Measure a compression strip spanning the width of the shoulder.
6.2.Measure the first security strip running along the front edge of the deltoid muscle.
6.3. Measure a second security strip running along the back edge of the deltoid muscle.
6.4. Round the tape ends.
6.5. Apply the compression strip spanning the width of the shoulder with 50% tension.
6.6. Apply the first security strip with 0% tension running along the front edge of the deltoid muscle to finish in the neck.
6.7. Apply the second security strip with 0% tension spanning along the backside of the deltoid muscle to finish in the upper neck.
1.1. Cut the tape lengthwise to produce 1-inch strips of tape.
1.2. Measure the two pieces of tape spanning the length of the scar.
1.3. Apply the first piece of tape with 75-100% tension.
1.4. Apply the second piece of tape pulling tension in the opposite direction to the first. Put 75-100% tension.
1.5. Rub in the tape to activate the adhesive.
Scar Taping
2. Linear scar
2.1. Cut the tape lengthwise to form 1-inch pieces of tape. Measure the tape to make sure it spans the length of the scar.
2.2. Apply the first piece of tape with 75-100% tension.
2.3. Apply the second piece of tape, forming a zigzag pattern through the middle of the scar with 75-100% tension.
2.4. Apply the third piece of tape in an alternating direction to the second while applying 75-100% tension.
2.5. Rub in the tape to activate the adhesive.
3. Zigzag scar
3.1. Cut the tape lengthwise to form 1-inch strips of tape and round the tape ends.
3.2. Measure the tape to span the length of the scar.
3.3. Apply the tape in a star pattern to cover the scar with the tape moving in alternating directions.
3.4. Each piece of tape should have 75-100% tension. This is designed to create a lifting effect on the scar.
3.5. Rub in the tape to activate the adhesive.
4. Star scar
4.1. Cut the tape lengthwise to form 1-inch strips of tape and round the tape ends.
4.2. Measure the tape to span the length of the scar.
4.3. Apply the tape in a star pattern to cover the scar, with the tape moving in alternating directions. Each piece of tape should have 75-100% tension. This is designed to create a lifting effect on the scar.
4.4. Rub in the tape to activate the adhesive.
5. Scar tab
5.1. Measure the security strip to span the length of the scar, cut up one inch longer than your measurement.
5.2. Fold the tape in half after ripping off the paper backing to create a tab in the center of the tape.
5.3. Place the tab along the length or width of the scar. Rub in the tape to activate the adhesive.
5.4. Take a second security strip and have it measure the length of the scar. Fold the tape in half and cut a small slit along the length of the tape to measure the length of the scar. Guide the tab through this piece of tape and rub in the tape to activate the adhesive.
5.5. While applying pressure to the tape, you can use the tab to help manipulate the skin underneath. This can be taught to the patient to use at home or in a clinical setting. This, again, is designed to relieve symptoms of a sunken scar.
Taping for posture
1. Humeral fault
*For this taping protocol, you would need another person’s help since it is a hard-to-reach area.
1.1. Position the shoulder in an externally rotated position the arm extended, and while making a fist.
1.2. Have the assisting partner measure a security strip from the inside of the elbow wrapping around the upper arm to finish at the opposite shoulder.
1.3. Round the tape ends.
1.4. Have the assisting person apply the security strip starting at the inside of the elbow wrapping around the upper arm with 50% tension. Have the tape finish at the opposite shoulder.
1.5. Rub in the tape to activate the adhesive.
2. Upper cross
*For this taping protocol, you would need another person’s help since it is a hard-to-reach area.
2.1. Maintain an ideal posture, correcting the head, neck, shoulders, and arms remembering to not overcorrect.
2.2. Have the assisting partner measure a compression strip running from one shoulder to the opposite shoulder.
2.3. Next, have him/her measure the first and second security strips running from the base of the skull towards the mid-back.
2.4. Round the tape ends.
2.5. Have the partner apply the compression strip with 50% tension running from the center of the back towards either shoulder.
2.6. Next, apply the first security strip starting at the base of the skull running towards the mid-back with 50% tension.
2.7. Then, apply the second security strip again starting at the base of the skull, running towards the mid-back with 50% tension.
2.8. Rub in the tape to activate the adhesive.
3. T- l hinge
*For this taping protocol, you would need another person’s help since it is a hard-to-reach area.
3.1. Stay in a standing position and correct the posture through the mid-back, remembering to not overcorrect.
3.2. Have the assisting partner measure a security strip running from the midline on the back finishing along the midline. Just underneath the ribs, apply the first security strip again starting in the midline of the back moving along the ribs to finish at the midline of the abdomen with 50 - 75% tension.
3.3. Apply the second security strip to match the first starting along the midline of the back, moving around the ribs to finish at the midline of the abdomen with 50-75% tension.
3.4. Rub in the tape to activate the adhesive.
4. Lower cross
4.1. Start in a standing position correcting the position of the low back, hips, and knees, remembering to not overcorrect.
4.2. Measure two security strips along the front edge of the abdomen and two security strips for each leg.
4.3. Round the tape ends.
4.4. Apply the first security strip starting at the short line moving along the front edge of the abdomen.
4.5. Apply the second security strip to match the first along the edge of the abdomen with 50% tension.
4.6. Apply the first security strip, starting at the top of the short line on the back of the leg with 50% tension to finish on the backside of the knee.
4.7. Apply the second security strip starting at the top of the short line to finish on the backside of the knee.
4.8. Rub in the tape to activate the adhesive.
5. Valgus collapse
5.1.Position yourself where the hip, knee, and foot are stacked upon each other.
5.2. Measure a security strip from the inside of the lower leg, dropping outwardly along the upper leg to finish at the level of the hip.
5.3. Cut the tape one to two inches shorter than the measurement and round the tape ends.
5.4. Start with the security strip along the inside of the lower leg wrapping outward along the upper leg to finish at the level of the hip with 50% tension.
5.5. Rub in the tape to activate the adhesive.
Edema Taping
1. Ankle edema
1.1. Cut two pieces of tape to span the length of the swollen area. Cut four one-inch fans in each piece of tape leaving a one-inch tab at the end of the tape.
1.2. Apply the security strip through the anchor, rip the paper backing off each individual fan.
1.3. Place each fan spanning the area of the edema with 0% tension on the tape.
1.4. Gently rub in the tape to activate the adhesive.
2. Thigh edema
2.1. Measure two security strips spanning the area of edema on the thigh.
2.2. Cut each security strip into four one-inch fans, leaving a one-inch tab at one end of the tape.
2.3. Secure the tape on the skin using the tab.
2.4. Apply each fan with 0% tension, removing the paper backing as you go. Remember that you want the fans to span the entire area of edema.
2.5. Apply the second security strip in an opposite direction to the first. Remove the paper backing and place the tab on the skin to secure the tape job.
2.6. Apply the fans individually removing the paper backing as you go. Each fan should be applied, again, with 0% tension.
2.7. Rub in the tape to activate the adhesive.
2.8. Upon completion of the tape job, you should have a basket weave pattern over the area of edema.
3. Arm edema
3.1. Measure two security strips spanning the entire length of the arm. Cut four one-inch fans leaving a one-inch tab at the end of the security strip. 3.2. Use the one-inch tab to landmark the tape on the skin.
3.3. Apply each fan spanning the entire length of the arm with 0% tension.
3.4. Remove the paper backing individually and rub in the tape to activate the adhesive as you go. Remember that you want the tape job to span the entire length of the arm or the entire area of edema.
3.5. Place the second security strip on the front edge of the shoulder using the tab to secure the tape to the skin. Again, apply each fan individually removing the paper backing as you go.
3.6. Rub in the tape to activate the adhesive.
3.7. You want the tape to span the entire area of edema, the front side of the arm, or the entire length of the arm.
3.8.Following the completion of the tape job, the tape should cover the entire circumference of the arm.
Want to get the best deals when purchasing Tape Geeks kinesiology tape? Visit our Amazon store TODAY!
[cta-all]
[cta-email]
Frequently Asked Questions About Kinesiology Taping
How long should kinesiology tape stay on different body parts?
Kinesiology tape can stay on for 3 to 5 days on most body parts, including the shoulder, knee, and back. High-movement areas like the ankle or wrist may need replacement every 2 to 3 days. Remove if you experience skin irritation, itching, or blistering. TapeGeeks tape is water-resistant, so you can shower and swim with it on.
What tension should I use when applying kinesiology tape?
Most kinesiology tape applications use 0% tension on the anchor strips (the first and last 2 inches of each strip). The middle "working" portion typically uses 25–50% tension depending on the goal — 25% for lymphatic/edema applications, 50% for muscle support. For posture correction, 0–25% tension is most common. Always apply anchors with 0% tension to avoid skin irritation at the edges.
Can kinesiology tape be used on every part of the body?
Yes — kinesiology tape can be applied to virtually any part of the body with skin, including the shoulder, neck, back, knee, ankle, wrist, elbow, and even around scars. However, avoid applying directly to open wounds, sunburned skin, or areas with active skin conditions. For sensitive skin, use a hypoallergenic kinesiology tape and perform a 24-hour patch test first.
How do I know if I'm applying kinesiology tape correctly?
Correct kinesiology tape application has these signs: the tape should feel comfortable and not restrict circulation, the skin should show slight "lifting" (rugae) between the strips, and the tape should stay on for at least 2–3 days. If the tape is causing pain, skin redness, or peeling within hours, you likely used too much tension or applied it incorrectly. Rub the tape firmly after application to activate the heat-sensitive adhesive.
What is the difference between kinesiology tape and athletic tape for body areas?
Kinesiology tape (KT tape) is elastic and stretches up to 140% of its original length — it moves with your body and is used for muscle support, pain relief, and lymphatic drainage. Athletic tape (rigid tape) is non-elastic and is used to immobilize and stabilize joints like the ankle or wrist. For most body areas requiring movement, kinesiology tape is preferred. For acute joint injuries requiring immobilization, athletic tape or a combination of both is used.
Should I shave before applying kinesiology tape?
Shaving the area before applying kinesiology tape is recommended for hairy body parts like the legs, chest, or arms — it significantly improves adhesion and reduces pain during removal. If shaving isn't possible, apply the tape over hair with extra rubbing to activate the adhesive, and remove it slowly while pressing skin downward to minimize discomfort.
Which TapeGeeks tape should you use for these taping guides?
If you are learning to tape a knee, shoulder, ankle, wrist, neck, or lower back, start with the TapeGeeks kinesiology tape collection. Regular rolls work well when you want to cut custom I, Y, or X strips. Precut kinesiology tape is easier when you want consistent strip lengths for quick home or gym use. For clinics, teams, and frequent taping, the TapeGeeks bulk kinesiology tape roll gives more applications per roll.
Runners building toward a 5K, 10K, or weekly training routine can also use RunMate Pro to track mileage and shoe wear, then use these taping guides when a sore spot needs light support before the next run.
Kinesiology tape for runners, explained honestly: what it does, how to apply it to knee, IT band and shin, race-day prep and recovery — from a Bronte Harbour Classic partner.