


Turf Toe Taping: Complete Recovery & Support Guide
Is that nagging pain in your big toe keeping you off the field? You're not alone. Turf toe is one of the most frustrating injuries for Canadian athletes, especially during our long indoor training seasons and on artificial turf surfaces.
This hyperextension injury of the big toe's metatarsophalangeal (MTP) joint can sideline you for weeks if not properly treated. But here's the good news: proper taping with kinesiology tape can significantly reduce pain, support healing, and get you back to doing what you love faster.
Whether you're dealing with a fresh injury or looking to prevent recurrence, this step-by-step guide will show you exactly how to tape turf toe like the pros do. No more guessing, no more ineffective taping that falls off after one practice.
What is Turf Toe?
Picture this: you're sprinting down the field, plant your foot, and suddenly feel a sharp pain in your big toe. That's turf toe in action.
Turf toe is a sprain of the metatarsophalangeal (MTP) joint - the joint that connects your big toe to your foot. It happens when that joint gets hyperextended (bent too far upward) beyond its normal range of motion.
The injury gets its name from artificial turf, where the surface is harder and less forgiving than natural grass. But it can happen on any surface - hardwood courts, uneven ground, even in your living room if you're not careful.
What Causes Turf Toe?
Your big toe is crucial for push-off during walking, running, and jumping. Turf toe occurs when this joint is forced into extreme dorsiflexion (bending upward), often when your foot is planted and your body weight drives the toe into the ground.
Common culprits include:
- Sports activities: Football, soccer, basketball, tennis, track events
- Playing surface: Artificial turf, hardwood courts, uneven surfaces
- Footwear: Flexible shoes that don't provide adequate toe support
- Repetitive stress: Activities that repeatedly stress the MTP joint
- Direct trauma: Impact to the toe while it's in a vulnerable position
How Do You Know If You Have Turf Toe?
Turf toe symptoms can sneak up on you or hit you like a ton of bricks. Here's what to watch for:
Grade 1 (Mild) - "I can still play, but it hurts":
- Mild pain and tenderness at the base of your big toe
- Minimal swelling
- You can still walk normally, but it's uncomfortable
- Pain gets worse with activity, better with rest
Grade 2 (Moderate) - "Okay, this is getting serious":
- Moderate pain that worsens with activity
- Noticeable swelling and bruising
- Limited range of motion in your toe
- Difficulty pushing off during walking or running
- Pain when bending the toe upward
Grade 3 (Severe) - "I can't even walk on this foot":
- Severe pain even at rest
- Significant swelling and bruising
- Severely limited or no range of motion
- Inability to bear weight on the affected foot
- Possible joint instability
When to See a Doctor
While mild turf toe can often be managed with self-care and taping, certain situations require professional medical attention:
- Severe pain that doesn't improve with rest and ice
- Inability to bear weight on the affected foot
- Significant swelling that doesn't decrease after 48 hours
- Numbness or tingling in the toe or foot
- Visible deformity of the toe or joint
- Fever or signs of infection
- No improvement after 2-3 weeks of conservative treatment
Why Taping Works for Turf Toe
Here's the thing about turf toe: you need support, but you also need to keep moving. That's where kinesiology tape shines compared to traditional athletic tape.
Dynamic Support That Moves With You
Unlike rigid athletic tape that locks your joint in place, kinesiology tape provides dynamic support that moves with your foot while preventing the hyperextension that caused your injury.
Think of it like having a gentle hand supporting your toe - it's there when you need it, but it doesn't get in your way. This is crucial because complete immobilization can lead to stiffness and actually slow down your recovery.
Natural Pain Relief
Kinesiology tape works through several mechanisms to reduce pain naturally:
- Gate control theory: The tape's pressure on your skin stimulates nerve fibers that can block pain signals
- Improved circulation: The tape's lifting action enhances blood flow, bringing healing nutrients to the injured area
- Reduced inflammation: Better circulation helps flush out inflammatory substances that cause pain
- Proprioceptive feedback: The tape provides constant sensory input that helps "retrain" your joint's position sense
Keep Moving While You Heal
One of the biggest advantages of kinesiology tape is that it supports healing without restricting movement. This is huge for turf toe because:
- Maintaining range of motion prevents joint stiffness
- Gentle movement promotes healing by stimulating circulation
- You can wear it during light activities, allowing for gradual return to normal function
- It prevents you from developing weird movement patterns that could lead to other injuries
What You'll Need
Don't worry - you don't need a lot of fancy equipment. Here's what you'll need to get started:
The Main Event: Kinesiology Tape
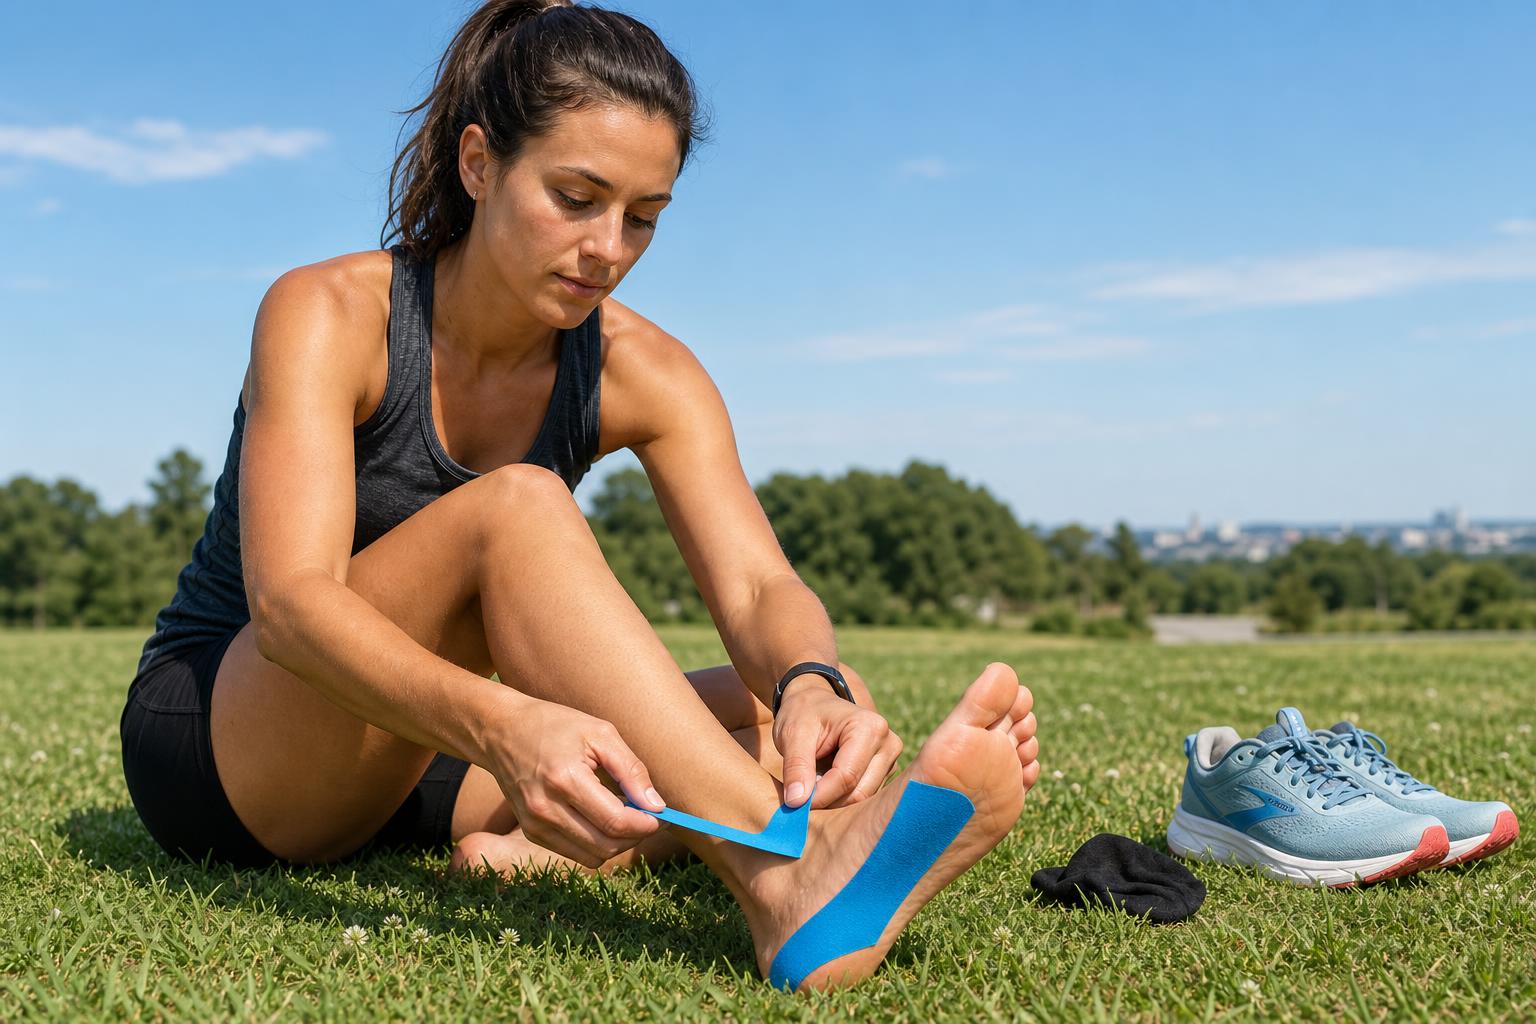
Kinesiology Tape: We recommend TapeGeeks Professional Kinesiology Tape for turf toe applications. Here's why our tape works so well:
- Superior adhesion that stays put for 3 days (then you'll want to replace it)
- Hypoallergenic, latex-free formula - perfect for sensitive skin
- Breathable design that won't trap moisture or sweat
- Multiple color options so you can match your team colors
- Pre-cut strips available for convenience
Alternative Option: If you prefer traditional athletic tape, TapeGeeks Athletic Tape provides rigid support, though it requires daily replacement and offers less flexibility.
Everything Else You Need
- Sharp scissors: TapeGeeks Precision Tape Scissors for clean cuts
- Skin preparation solution: Alcohol wipes or specialized skin prep
- Clean, dry towel: For thorough drying
- Measuring tape or ruler: For accurate tape length measurement
- Mirror (optional): For better visibility during application
How to Tape Turf Toe: Step-by-Step
Ready to get your turf toe taped up? Follow these steps and you'll be back on your feet in no time. Take your time with each step - rushing through this will only lead to frustration and ineffective taping.
Get Ready: Preparation is Key
Step 1: Clean and Prepare Your Foot
- Wash your foot thoroughly with soap and water
- Remove any lotions, oils, or creams (they'll prevent the tape from sticking)
- Dry your foot completely with a clean towel
- Use alcohol wipes to remove any remaining oils or debris
- Make sure your skin is completely dry before proceeding
Step 2: Get Comfortable
- Sit in a comfortable position with your foot elevated
- Position your foot in a neutral, relaxed position
- Don't bend your toe too far up or down
- Make sure you can easily reach all areas that need to be taped
Step 3: Measure and Cut Your Tape
- Measure from the base of your big toe around your foot to the starting point
- Cut 4-6 strips of tape, each 6-8 inches long
- Round the corners of each strip to prevent peeling
- Have all strips ready before you start - you don't want to be cutting tape with sticky fingers
Now for the Taping: Let's Do This
Step 4: Apply the First Anchor Strip
- Start with your foot in a neutral position
- Apply the first strip around the base of your big toe
- Use 50% stretch (moderate tension) - not too tight, not too loose
- Make sure the tape lies flat without wrinkles
- Rub the tape gently to activate the adhesive
Step 5: Add the Support Strip
- Apply the second strip diagonally across the MTP joint
- Use 75% stretch (firm tension) for maximum support
- Start from the inner side of your foot, cross over the joint
- End on the outer side of your foot
- Make sure the tape covers the most painful area
Step 6: Create the X Pattern
- Apply a third strip perpendicular to the second
- Use 50% stretch for moderate support
- Create an "X" pattern over the joint
- Make sure there's good overlap with previous strips
- Rub gently to secure adhesion
Step 7: Secure Your Toe
- Apply a strip along the length of your big toe
- Use 25% stretch (light tension)
- Start at the tip of your toe, end at the base
- This prevents hyperextension during activity
- Make sure your toe can still move naturally
Step 8: Final Touches (If Needed)
- For severe cases, add additional support strips
- Apply strips around the entire foot for extra stability
- Use 25-50% stretch depending on comfort level
- Make sure all strips are securely adhered
- Check for any loose edges or wrinkles
Tips for Best Results
- Warm the tape: Rub each strip for 10-15 seconds to activate the adhesive
- Apply without stretch on ends: Leave 1-2 inches unstretched at each end for better adhesion
- Work quickly: Apply each strip within 30 seconds of removing the backing
- Check alignment: Ensure strips are straight and properly positioned
- Test movement: Gently move the toe to ensure proper range of motion
How Long to Wear the Tape
Proper tape duration is crucial for both effectiveness and skin health. Here's what you need to know:
Duration Guidelines
Recommended Duration: 3 days maximum before removal and skin rest. While TapeGeeks tape can stay on for 5-7 days, we recommend removing it after 3 days and giving your skin a 24-hour break before reapplying fresh tape.
Why 3 Days Maximum?
- Skin health: Allows skin to breathe and recover from prolonged adhesive contact
- Hygiene: Tape absorbs dirt, dust, soap, and other particles that can transfer to your body
- Adhesion quality: Fresh tape provides better support and adhesion
- Prevents irritation: Reduces risk of skin sensitivity or allergic reactions
Activity Level Considerations:
- Light activity: 3 days maximum, then 24-hour skin rest
- Moderate activity: 2-3 days, then 24-hour skin rest
- High activity: 2 days maximum, then 24-hour skin rest
- Swimming/water sports: Replace after each session
When to Replace
Replace the tape when you notice:
- After 3 days maximum - regardless of condition (recommended practice)
- Edges starting to peel or lift
- Reduced adhesion and support
- Significant wrinkling or bunching
- Discomfort or skin irritation
- Visible dirt or debris accumulation
- After showering or swimming (if tape becomes loose)
Signs to Remove Early
Remove the tape immediately if you experience:
- Severe skin irritation or rash
- Increased pain or discomfort
- Numbness or tingling in the toe or foot
- Signs of allergic reaction (redness, itching, swelling)
- Circulation problems (cold, pale, or blue toe)
- Any unusual symptoms that concern you
Additional Recovery Tips
While taping is an excellent tool for turf toe recovery, it works best as part of a comprehensive treatment plan:
Rest and Ice
RICE Protocol:
- Rest: Avoid activities that aggravate the injury for the first 48-72 hours
- Ice: Apply ice for 15-20 minutes every 2-3 hours for the first 48 hours
- Compression: Use the tape for gentle compression, or add an elastic bandage if needed
- Elevation: Keep the foot elevated above heart level when resting
Stretching Exercises
Toe Stretches (Begin after acute phase):
- Toe extension: Gently pull the big toe upward and hold for 30 seconds
- Toe flexion: Gently push the big toe downward and hold for 30 seconds
- Toe circles: Slowly rotate the big toe in circles, both directions
- Marble pickups: Use your toes to pick up marbles or small objects
Calf and Foot Stretches:
- Calf stretch: Lean against a wall with one foot forward, stretch the back calf
- Plantar fascia stretch: Roll a tennis ball under your foot
- Ankle circles: Rotate your ankle in both directions
When to Return to Activity
Return Criteria:
- Pain-free walking and light jogging
- Full range of motion in the big toe
- No swelling or tenderness
- Ability to push off without pain
- Successful completion of sport-specific movements
Gradual Progression:
- Week 1-2: Light walking and stretching
- Week 3-4: Light jogging and basic exercises
- Week 5-6: Sport-specific drills and training
- Week 7+: Full return to competition
? Turf Toe Taping FAQs
You've Got This
Turf toe taping with kinesiology tape is a game-changer for recovery and prevention, but it works best as part of a comprehensive treatment plan. By understanding your injury, using proper taping techniques, and following recovery guidelines, you can significantly reduce pain, support healing, and get back to your activities faster.
Remember, every injury is unique, and what works for one person may not work for another. Start with the basic techniques outlined in this guide, and don't hesitate to consult with a healthcare professional if you have concerns or if your symptoms don't improve.
With the right approach and quality materials like TapeGeeks Professional Kinesiology Tape, you can take control of your turf toe recovery and get back to doing what you love.
This guide is part of TapeGeeks' commitment to providing Canadian athletes with the knowledge and tools they need for optimal performance and recovery. For more taping guides and athletic support products, visit our Complete Guide Library.
📚 Continue Your Taping Journey
Learn more about kinesiology tape applications and injury prevention:
🎯 How to Use Kinesiology Tape
Discover the versatility of kinesiology tape beyond sports injuries - including innovative applications for better breathing and sleep quality.
Read Guide →🏃♀️ Unlock Your Athletic Edge
Learn how nasal breathing can transform your running performance with BREATHE+ nasal strips - backed by science, built for results.
Read More →💪 How to Improve Posture
Suffering from back pain? Learn how proper posture support with kinesiology tape can help relieve discomfort without expensive treatments.
Learn How →📱 RunMate Pro App
Track your training progress with our privacy-first running app focused on injury prevention and sustainable training for life.
Download App →Want to explore more taping techniques and injury prevention tips?
Browse All Articles